If you’re not wanting to pay for a Google Map on your website, you’re not alone.
At the end of 2018, Google changed its pricing model for Google Maps usage and introduced a new ‘pay-as-you-go’ model.
While Google does offer a $200 monthly credit for the service, a lot of website owners felt frustrated that they now had to pay for a service they’ve been using for free for years.
I get it though, services, staff and keeping servers running efficiently costs money.
No matter which side of the fence you fall on, here are 3 ways to embed a Google Map on your website that doesn’t rely on the custom Google Maps API or handing your credit card over to Google.
Feel free to watch the video below to see demonstrations for all 3 or click on a method name below to jump to that tutorial.
- Standard Embed (around 0:52 in the video)
- Custom Map Embed (around 3:06 in the video)
- Responsive Image Trick (around 8:08 in the video)
Standard Embed Code
The standard embed code is the easiest and most direct method of getting a Google Map embedded on your website without having to pay.
Here are a few of the benefits of using this method:
- easiest to set up
- maintains map interactivity
- responsive on mobile devices
This method is demonstrated around 0:52 in the video shown above.
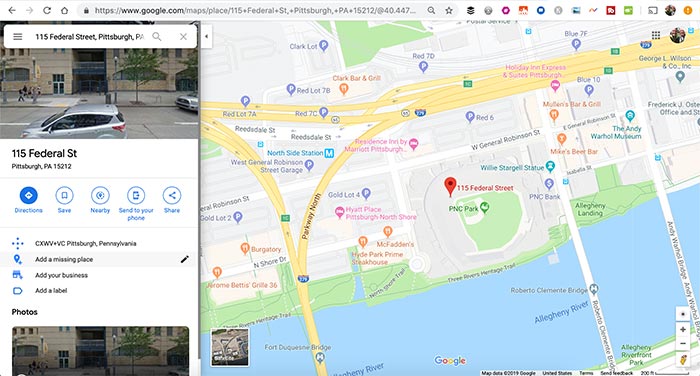
Step 1: Perform a search on Google Maps
Head over to Google maps and do a search for the location you’d like to display in your Google Map embed.
Step 2: Get Embed Code
To get the embed code for your map, click on the ‘share’ icon in the left panel on the screen.
A popup window will be displayed asking if you want to ‘share a link‘ or ‘embed a map‘ – click on ‘embed a map.’
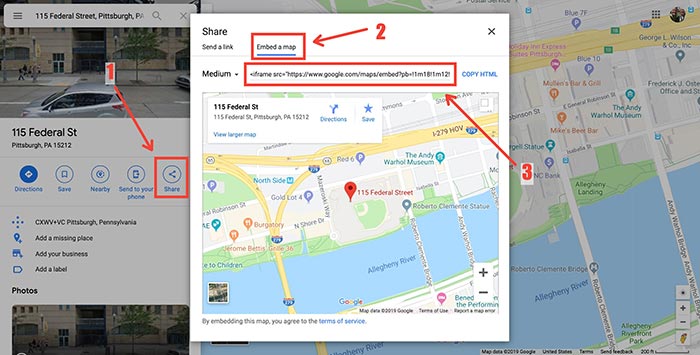
Google Maps will then show you an iframe code. Copy this code – it’s what we’re going to paste on our website to display our map.
Step 3: Embed the map!
Now that we have our iframe code, we’re going to use it to embed the Google Map on our website .
Open your website editor (in the video, I’m using the Divi theme from Elegant Themes which is pretty awesome. Awesome enough that the link I’ve used is my affiliate link, which means if you purchase it through that link I may be compensated at no cost to you – it helps supplement the cost of running this website and developing our products.)
In the video, I used the Divi builder to easily embedded the map as a full width map section on the contact page but feel free to put your map where ever you’d like.
Embedding a Custom Google Map
This method is demonstrated around 3:06 in the video at the top of the post and differs a bit in the setup stage compared to the standard maps embed.
This method is cool because it:
- offers map customizations
- can display multiple map marker locations on one map
- displays a lot of location data compared to the standard embed
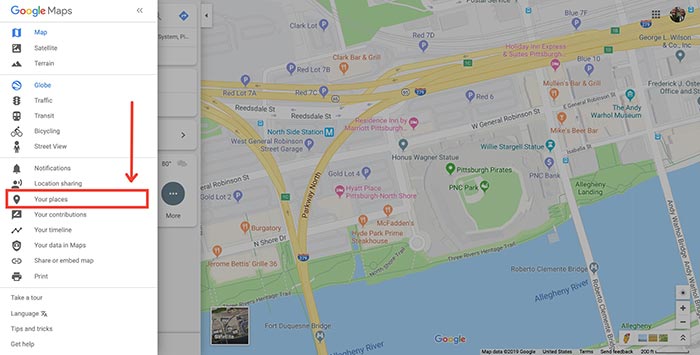
Step 1: Open the custom Google Map screen.
Go to Google Maps and then click on the ‘hamburger’ menu icon in the upper left corner of the screen.
An admin menu will slide out – click on the option that says ‘Your places.’
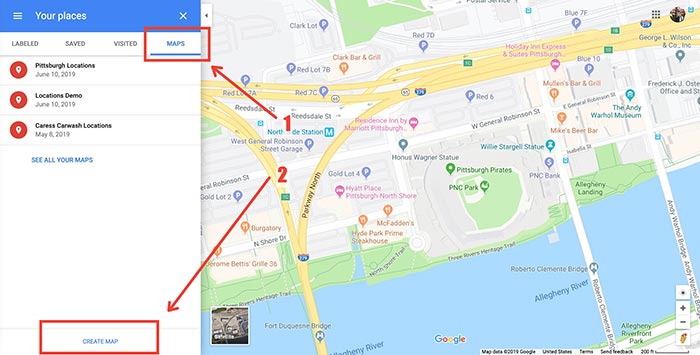
Next a new panel will open with some options. You want to click the Maps tab and then scroll down and click the ‘Create a Map’ button found at the bottom of the page.
Step 2: Build a custom Google Map
Once your new map is created, you can start adding locations to it.
First, I recommend changing the title of the map because it will be visible on your website and it will help you keep things organized if you create multiple maps.
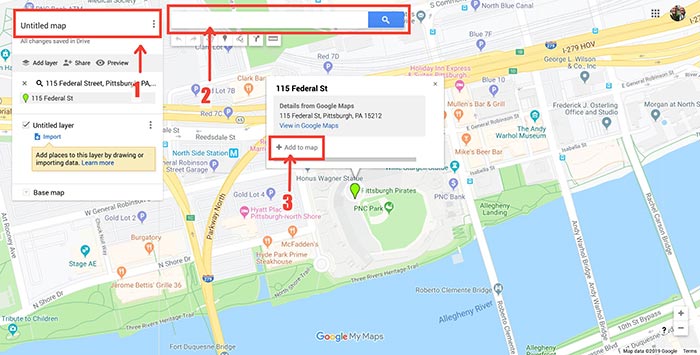
After that, use the search bar at the top of the map (2) to start finding your locations and then click ‘Add to Map‘ (3) in the info window for each location to add it to your map.
As an added bonus you can also add in custom text, images and colors as well as use custom map marker icons after you add a location to your map.
I show a few examples of this in the video if you’re interested in really customizing your map.
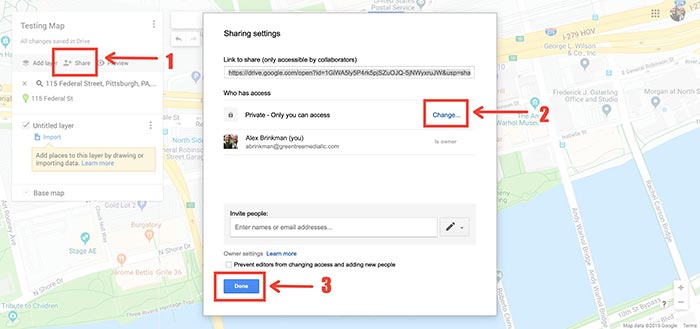
Step 3: Make your custom map public
In order to embed the map on your site, you’ll likely need to change the permissions on your map. If you get an error that your map isn’t yet public, click on the Share icon below your map name and in the popup window, under ‘Who has access,’ change it to ‘Public on the web.’
Once you’ve made the change, click the Done button at the bottom of the window.
Step 4: Get custom map embed code
Now that your map is publically viewable, we just need to grab the embed code.
Click the 3 horizontal dots next to your map’s name and select the option that says ‘Embed on my site.’
Google Maps will then provide you with an iframe code similar to the standard method which you can embed on your site.
Responsive Image Trick
This is one of my favorite methods due to its simplicity and ‘future-proofness.’ You can see a demonstration of this method around 8:08 in the video.
With this method, we aren’t actually embedding a map at all – we’re displaying a map image and then letting Google Maps to do all the heavy lifting.
The main benefits of this method are:
- No GDPR considerations since you’re not loading external resources
- reduces the number of external HTTP requests on page load
- loads quickly
- opens to Google Maps app on mobile devices if available
Step 1: Grab a screenshot of Google Maps
Visit Google Maps, perform a search for the location you want to display and take a screenshot of the map.
You’ll want to optimize this screenshot for the web using a platform like Photoshop or Pixlr (for a great tutorial on optimizing website image using Pixlr.com, check out this article I wrote) because likely the image size will be large than you want.
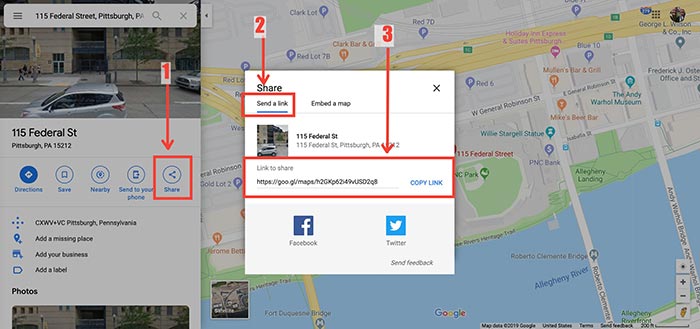
Step 2: Grab the Maps Link
You’re also going to need the link to this Google Map search.
You can get the link by clicking the share icon in the left hand panel, clicking the ‘Send a link‘ tab and then copying the link provided by Google.
Step 3: Embed the Map (image)
Now, simply add the screen shot of your Google Map to your website.
Make sure the image is clickable and set the link to the custom link we just copied in Step 2. This is important because when users click it, we want them to be directed to Google Maps (ideally in a new tab) so Google Maps can do the heavy lifting of showing them information and directions.
Another bonus to this method is that if a mobile user clicks the image and has the Google Maps app installed on their device, the Google Maps app will open and will handle everything natively, making for a very smooth user experience.
Wrapping Up
These are just 3 of the ways to embed a Google Map on your website but there are also plenty of plugins out there that will do the job as well.
If you have other ways of embedding a Google Map on your site that have worked well for you, let me know about it in the comments!
